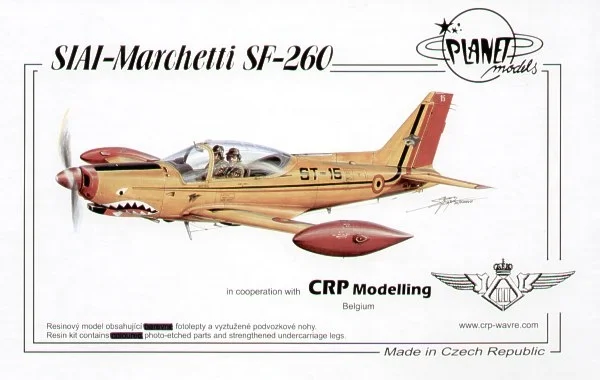
Siai-Marchetti Sf260 (Belgian Air Force) 1/48 Resin Kit Planet Models
€70.00
Siai-Marchetti Sf260 (Belgian Air Force) 1/48 Resin Planet Models
2 in stock
- Satisfaction Guaranteed
- No Hassle Refunds
- Secure Payments
Description
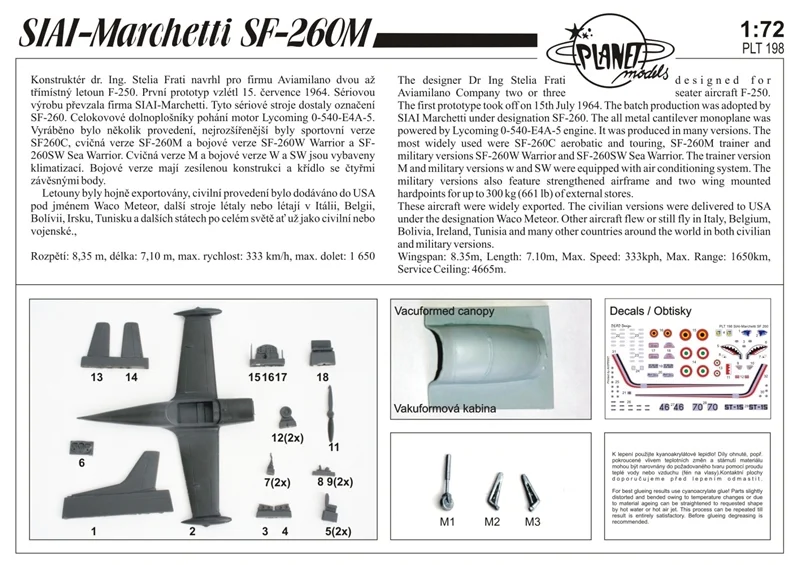
SIAI-Marchetti SF260 (Belgian Air Force) 1:48 Kit
Resin Kit – Planet Models
N.B. Adult Supervision required. Always Ensure everyone near model is wearing Eye Protection Safety Glasses.
This is a Resin kit so Ideally suited to Experienced Modellers only.
The SIAI-Marchetti SF.260 (now Finmeccanica SF-260) is an Italian light aircraft marketed as an aerobatics and military trainer. It was designed by Stelio Frati, originally for Aviamilano, which flew the first prototype of it (then designated F.260) on July 15, 1964. Actual production was undertaken when SIAI Marchetti purchased the design soon thereafter and continued with this firm until the company was bought by Aermacchi in 1997. The military versions are popular with smaller air forces, which can also arm it for use in the close-support role.
General characteristics:
Resin Kits are expensive because they are sold in smaller volumes. Its a cottage industry compared to the big brands.
This is because Companies that make Resin Kits usually concentrate on subjects not made by the main model companies.
Resin Kits like the CMR SF260 below often contain extra detail like Metal Etch Parts and sometimes metal Undercarriage.
we offer the following advice guide: From CMR.
2) – Wash the parts thoroughly with detergent before any assembly or painting. This is to remove mould release agent left over from the manufacturing process.
3) – Carefully remove the parts from the pouring blocks using a razor saw – or scalpel for small items – and clean them up before starting construction. Resin can be sanded easily and scribed like styrene to restore over-sanded panel lines, although scribing is best accomplished with a very sharp scriber and light strokes. Note: a certain amount of “Flash” is normal on resin kits due to the manufacturing processes involved, but this is easily removed.
4) – Test-fit everything to check for a decent fit before committing to glue. Some shrinkage is normal for resin parts due to the batch variances in resin used and temperature.
5) – Warped parts are not that unusual in resin kits and can easily be corrected by gently heating the part with a hairdryer or by running it under a lukewarm tap before easing it back into shape.
6) – Use 5-minute Epoxy for large joins. Cyanoacrylate adhesive is more suitable for smaller joins.
7) – Gaps can be filled using “Superglue” Gel (such as Pro-Bond No.3 Slow Set/Gap Filling cyanoacrylate) or normal model filler (such as Milliput epoxy putty). When using normal model filler it is possible to use a cotton bud lightly coated in Acetone (nail varnish remover) or Cellulose thinners to clean up the join as, unlike polystyrene, resin does not melt when in contact with cellulose thinners.
8) – Use a resin primer such as “Mr. Resin Primer Surfacer” (by Gunze Sangyo) as this will reveal any “Pinholes” left by air bubbles as a result of the manufacturing process – it also provides a key for the final paint finish to adhere to.
9) – Pinholes can be filled using drops of primer, superglue or even correction fluid (such as Tippex).
10) – Wash the model again with detergent before painting it, to ensure any grease from handling has been removed.
11) – Resin kits can be painted with normal model paints i.e. Enamel or Acrylic paints (such as: Gunze Sangyo, Humbrol, Model Master, Revell, Tamiya, etc.).
12) – Vac-form canopies are normally supplied in pairs. P.V.A. glues (such as Krystal Klear) are best for affixing to the model – applied by small brush; any excess can be removed with a damp cloth before it has cured. However by first dipping the canopies in Johnson’s “Future”, not only does this improve the transparency of the canopy material, but it also prevents Cyanoacrylate (Superglue) from fogging them. Note: Cyanoacrylatesshould not be used directly on untreated acetate canopies, as a white ‘blooming’ may occur due to the adhesive reacting on contact with the transparency material.
13) – Decals supplied with our models do not require the use of solvents during their application.
14) – Many of our newer models now include Photo-Etch Detailing Sets. PE parts are best glued with cyanoacrylate (superglue).
Additional information
| Weight | 1 kg |
|---|